
Home Blog Page 1732

Drying tomatoes: tricks for making the Mediterranean delicacy yourself

0

Ripe tomatoes are a treat, but sometimes they ripen faster than you can eat them. Drying tomatoes is an easy way to preserve their intense flavor. Whether as a snack, in sauces or on pizza – dried tomatoes bring a Mediterranean flavor to your kitchen and last for months if stored properly.

Why sun-dried tomatoes are so special

Drying tomatoes removes water from them, which means they keep for longer. At the same time, their aromawhich makes them a versatile ingredient. Whether in salads, stews or even as a snack – their flavor intensifies through drying and provides a unique seasoning.


You may also be interested in these articles:


Step by step: How to dry tomatoes

The easiest way to dry tomatoes is in the oven. With a little patience, you can achieve perfect results:

Preparation:

Wash the tomatoes thoroughly, halve them or cut them into slices. If you like, you can cut the Remove the seedsbut this is optional.

Seasoning:

Place the tomato pieces on baking paper and sprinkle them with a little saltto remove the moisture. If you want to flavor them, you can add herbs such as thyme or rosemary.

Drying:

Set up the oven 80 to 100 degrees circulating air. Leave the door ajar so that the moisture can escape. Depending on the thickness of the tomatoes, the process takes six to ten hours.

For those who like it traditional, the tomatoes can also be left in the oven on sunny days. dry in the sunwhich, however, takes several days. Another option is the Dehydratorwhich delivers consistent results with lower energy consumption.

How to store dried tomatoes correctly

Proper storage is crucial to preserve the freshness and aroma of your dried tomatoes. Store them in airtight jars to protect them from moisture. If you want to make them even more aromatic, place them in high-quality olive oil . Herbs such as rosemary or thyme and garlic go well with it.

Make sure that the tomatoes are completely dried – they should be leathery and should never be damp to avoid mold.

Ideas for use

Dried tomatoes are very versatile:

  • Cut them small and add them Saucessoups or stews.
  • Soaking makes them softer and gives them a smoother texture – ideal for pesto, pizza or focaccia.
  • As a snack, in salads or as an ingredient in home-baked bread, they provide a special flavor.

Not only their taste is convincing – dried tomatoes contain many antioxidants such as lycopenewhich benefit your health, and are rich in minerals. With dried tomatoes you can be sure of an aromatic ingredient that is versatile and will keep for months. Whether in the oven, in the sun or in a dehydrator – drying tomatoes is uncomplicated and ideal for using up surplus produce.

Checklist: Drying tomatoes made easy

  • Preparation: Wash, halve or slice the tomatoes and remove the seeds if desired.
  • Drying: Dry in the oven, dehydrator or in the sun until they are leathery.
  • Storage: Store in airtight jars, optionally in olive oil with herbs.
  • Use: Perfect for pesto, pizza, bread, soups or as an aromatic ingredient in salads.
  • Added value: Dried tomatoes impress with their intense aroma and valuable ingredients.

This article was partly created with the help of a machine and carefully checked by the editorial team before publication.


Drying bay leaves: how to preserve the full aroma

0

Fresh bay leaves are an indispensable ingredient in many dishes. But what do you do if you have more than you can use straight away? Drying bay leaves is an easy way to preserve their intense aroma in the long term. Dried, they not only keep for longer, but can also be used in a variety of ways – whether in the kitchen or at home.

Dry bay leaves properly

To dry the full flavor of the bay leaves, you should dry them at the right time. Choose leaves that are green, supple and free from damage. Rinse them carefully under cold water to remove dirt and pat them dry thoroughly with a kitchen towel.

  • Air dry: This is the gentlest way to dry bay leaves. Place the leaves individually on a clean cloth or a grid. Choose one shady, well-ventilated place and make sure that the leaves do not lie on top of each other. After two to three weeks, the leaves will be dry and slightly brittle.
  • Oven: For faster drying, you can place the leaves on a baking sheet and bake at 50 degrees Celsius dry. Leave the oven door ajar to allow the moisture to escape. This method requires more attention, but delivers a perfectly dry result in just a few hours.

During the drying process, the laurel loses some of its freshness, but develops a more intense, spicy note that comes into its own in the kitchen.


You may also be interested in these articles:


The right storage for long-lasting aroma

After drying, the Storage is crucial for preserving the aroma over a long period of time. Store the bay leaves in a airtight containersuch as a screw-top jar or a well-sealed tin. Store the container in a dark, cool placeas light and heat can destroy the essential oils.

If you want to keep the leaves fresh for even longer, the Vacuum packing . Crush the leaves just before use, as this preserves the flavors better. Whole leaves retain their flavor much longer than crushed leaves.

Dried bay leaves in the kitchen

Dried bay leaves are a classic in many dishes. They are perfect in soups, stews, sauces or stews. Add the leaves to the dish early so that they can develop their full flavor. You should remove the leaves before serving, as they are hard and inedible.

Tip: Usually enough one or two sheetsto achieve an intense flavor – less is often more.

In addition to their culinary use, you can also use dried bay leaves for other purposes. In Herbal tea blends give your tea a slightly tart note, which is particularly effective in combination with mint or lemon balm.

Bay leaves are also ideal for scented sachets or potpourris. Their subtle fragrance lasts moths away and ensure a pleasant freshness in the closet. They are therefore not only an asset in the kitchen, but also provide added value in the home.

Versatile and durable

With just a few steps you can Dry bay leaves and can be used in a variety of ways. Whether as a spice in the kitchen, as moth protection or as an aromatic addition to teas – dried bay leaves are a valuable everyday companion. Properly processed and stored, they remain aromatic and effective for months.

Checklist: Drying bay leaves made easy

  • Harvest time: Select green and supple leaves.
  • Drying methods: Air drying for a gentle aroma, oven for quick results.
  • Storage: Store in airtight jars or tins in a dark and cool place.
  • Use: Perfect for soups, teas, stews or as moth protection.
  • Intense aroma: Crush the leaves just before use.

This article was partly created with machine support and carefully checked by the editorial team before publication.


Opening the door without a key: how it works

0

It’s probably happened to many of us before: You pull the door shut behind you and suddenly remember that you’ve forgotten the key in your apartment. Now good advice is expensive – as is the costly locksmith service. If you want to save yourself the money, try opening the door without a key. All you need is a simple shoelace!

Shoelace trick opens door without a key

An experience that nobody wants to have: you’ve locked yourself out. In an inattentive moment, the door slams shut and the dilemma is over. The only option is to call an emergency locksmith and the usually expensive service that goes with it.

Locked out: How to open the door without an emergency locksmith. Photo: Media Partisans/FUNKE Digital

Until now! A video on the internet shows how you can open your patio door with a simple shoelace. Requirement: The door is tilted and you have a pair of lace-up shoes to hand. Both are true? Then pay close attention to how you get back into the house without your key:

Here you will find external content from YouTube that is recommended by our editorial team. It complements the article and can be displayed and hidden again with one click.

I agree to this external content being displayed to me. Personal data may be transmitted to the provider of the content and third-party services.

Pick up a shoelace

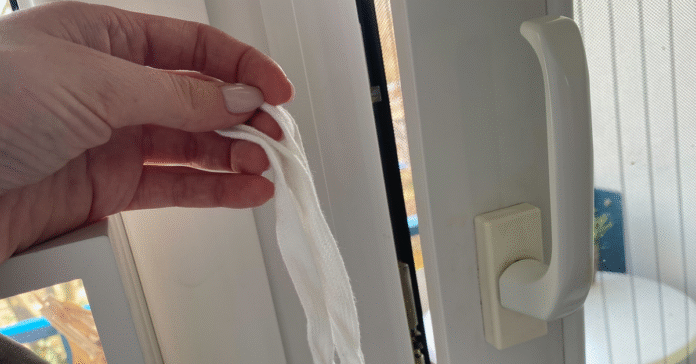
Take a long shoelace and tie a tight loop as described in the video. Once your small lasso is tied, you can push the string through the open window or door. Attach the loop to the handle and run the rest of the cord to the other end of the window. Now, with a little strength and patience, you can move the handle and pull it into a horizontal position.

This trick should allow you to open your window or door without a key and get back into your home. If there is no open window, this trick will of course not work. Then you’ll have to bite the bullet and call an emergency locksmith. But before you leave a window ajar to be on the safe side in future, be aware that burglars also use this trick. Do you know any other tricks if you’ve accidentally locked yourself out?

Source: ©Youtube/Recommendation Fox

1080x1080 whatsapp

Cleaning the garbage can: 4 simple household remedies that are powerful odor killers

0

As soon as the temperatures rise, your garbage can turns into a disgusting odor trap: once opened, you are hit with the full force of a nasty stench. But don’t worry: with a few simple tricks, you can clean your garbage can and effectively combat unpleasant odors – and it’s easier than you think!

Why do garbage cans smell so bad?

To prevent your garbage can from becoming a stink bomb, you should clean it regularly. Photo: IMAGO / blickwinkel

It is not surprising that residual waste garbage cans in particular become real stink bombs, after all they mainly contain food waste such as eggs, fish, meat, but also vegetables such as cabbage or potato peelings. As soon as this organic waste starts to rot, hydrogen sulphide and butyric acid are released. If you remember your chemistry lessons, the disgusting stench of these putrefying gases will probably come back to your mind.

In particular, residues of animal origin containing fat and protein penetrate into stinking spheres that are difficult to bear. If the temperature then rises and the sun turns the garbage can into a sauna, you should act quickly and clean your garbage can after the next emptying.

Clean your garbage can – but do it properly!

If waste remains stick to the walls of the garbage can after it has been emptied, numerous microorganisms survive there – and they enthusiastically pounce on fresh supplies as soon as new waste is added – a foul-smelling vicious circle! The following cleaning tips will protect your sense of smell:

Quick cleaning

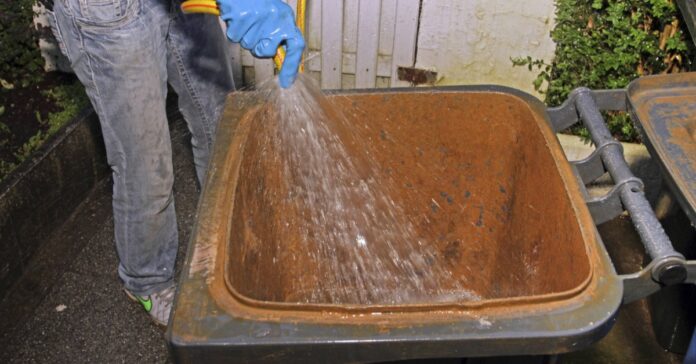
You should give your garbage can a quick clean after every emptying – the best way to do this is with a garden hose or a pressure washer. Simply spray the inside walls and base of the garbage can and tip the dirty water down the drain. To dry, simply lean the garbage can against the house wall at an angle – well ventilated and upside down so that the last drops disappear.

Thorough cleaning

In addition to quick cleaning, you should also clean your garbage can thoroughly on a regular basis. If stubborn dirt collects on the walls, there’s only one thing to do: brush it out! Soak the garbage can in hot water and scrub it clean with an environmentally friendly cleaner and a stiff brush. Then rinse well and leave to dry.

Home remedies for stink – cheap and effective

You don’t have to use chemicals to remove the stench. Instead, use tried and tested household remedies:

  • Vinegar essenceMix one part vinegar with ten parts water and pour the mixture into a sprayer. Use this to spray your garbage can thoroughly after cleaning. The acid will kill even the last bacteria.
  • Citric acid has a similar effect to vinegar, but smells more pleasant. Again, prepare the solution according to the instructions on the packet and spray your garbage can with it.
  • Garden lime binds moisture and odors: simply sprinkle it into the garbage can after cleaning or pour it directly onto strong-smelling garbage. The bad smell will disappear!
  • Newspaper or paper bags in organic waste absorb liquid and prevent the sludge from spreading in the garbage can.

Tip: Wear gloves when handling acid and lime!


You may also be interested in these articles:


It all depends on the right location

Even the cleanest garbage can will turn into a stink bomb in midsummer if you put it in full sun. It’s better to choose a shady, cool location – the north side of the house is perfect. Even better: a well-ventilated garbage can cabinet 🛒 protects it from the sun and prying eyes.

Tip: If your garbage can still smells despite all the measures you’ve taken, there’s a wild card: cat litter! Put a few handfuls on the bottom of the garbage can – the litter works wonders against moisture and odor.

Conclusion: Cleaning your garbage can is worth it!

With a few simple steps and household remedies, you can keep your garbage can hygienic and odor-free. Make sure you clean it regularly and put it in the right place – so there’s no more reason to turn up your nose!

1080x1080 whatsapp

Source: mein-schoener-garten.de


Fridge: These 8 tricks will keep your fridge tidy

0

It’s a really nice feeling to pack the fridge full after a week’s shopping. But since you rarely find an empty fridge, everything usually ends up piled up all over the shelves. But it’s not difficult to keep your fridge tidy. Find out here how to organize your fridge properly so that spoiled food doesn’t stand a chance.

8 ingenious tricks to keep your fridge tidy

Open jars, bags and bottles, rotten vegetables – is your fridge a mess? No problem! The following tricks will help you to keep your fridge tidy:

Storage bins

Simply place one or more upright bins in your fridge. They are perfect for storing vegetables or keeping drinks cold.

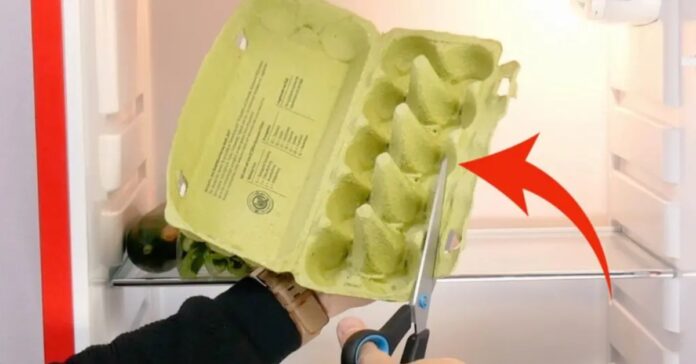
Egg carton

This is the ingenious way to keep your fridge tidy with an egg carton. Photo: FUNKE Digital/Media Partisans

Simply cut off the short flap and lid of an egg carton and put the bottom part in the fridge. This way you can store sauces and small bottles neatly in a row.

Clean bottoms

For this you need:

This is how it works:

Cut a mat to size so that it fits on the glass shelves of the fridge. That way, you won’t have any stains on it in future. You can easily remove the mat and clean it under the tap.

Fridge: Tidy up the freezer compartment

For this you need:

  • 4 small plastic baskets
  • Pen and paper

This is how it works:

With this trick, you will always fish the right thing out of the freezer at the first attempt in future. Attach notices to four plastic baskets with their contents – and you’ll quickly find what you’re looking for next time.

Turntable

With this trick, there’s no more rummaging and searching in the fridge, just order. Place jars and other containers on a turntable – and with just one movement you have the product of your desire right in front of you.

Snacks ready to hand in reusable jars

Do you always have too many vegetables in the fridge and never get around to eating them all before they spoil? Simply cut carrots, carrots & Co. into small pieces and put them in reusable jars. You can then store them perfectly in the side compartments of your fridge.

Fruit and vegetable bags

For this you need:

  • Multipurpose staples
  • Freezer bags

This is how it works:

This trick is another convenient way to store fruit and vegetables. Fill the desired fruit or vegetables into freezer bags and clamp them from above through the grid using a multi-purpose clamp. This also allows you to easily stack more food under the hanging bags.

Fruit on the fridge door

For this you need:

  • Velcro tape
  • 2 food storage containers

This is how it works:

For the last space-saving trick, you need Velcro tape and Tupperware containers. Stick one side of the Velcro tape to the bottom of the cans and the other side to the inside of the fridge door. Now you can fill the tins with fruit and stick them to the door.

With these eight tricks, putting things away in the fridge will be child’s play and your fridge will finally be tidy. No more space problems, no more squashed or crushed fruit and vegetables and no more endless searches in the depths of this household appliance.

1080x1080 whatsapp

Cleaning the ceramic hob: How to remove metallic stains

0

Most kitchens have ceramic hobs on the stove. Compared to conventional cast iron hobs, they have the advantage that they can be operated in a more controlled manner, which makes them much more energy-efficient. Ceramic hobs are also very easy to clean – provided you always clean them immediately after cooking. However, even if you use a cleaning cloth immediately after cooking, strange metallic stains can still form on the surface over time. The question is: where do they come from and how do you get rid of them?

Cleaning the ceramic hob: Helpful tips to remove annoying stains

Unfortunately, simple scrubbing is not enough here, other means are required. However, these do not always have to be expensive – on the contrary simple household remedies are often sufficient.

To remove metallic stains on your ceramic hob, you can use effective household remedies. Photo: IMAGO / Jürgen Eis

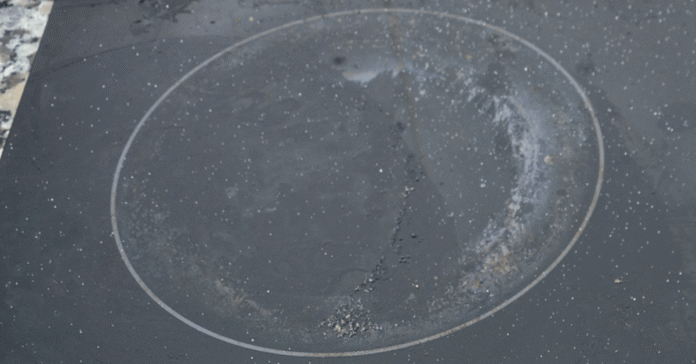
But first we would like to answer the question of where these iridescent stains actually come from. The answer is quite simple: pans and pots are often to blame for the annoying stains. The reason for this is the copper and aluminum-containing alloys in our cooking utensils, which fuse wonderfully with the ceramic surface through friction. Even if it seems that the stains have formed underneath the glass surface and are therefore impossible to remove, we can reassure you – this is rarely the case!

As a rule, it is always important to clean the hotplates, whether ceramic or cast iron, immediately after use. This can be easily done with conventional cleaning agents and a sponge or cloth. However, the hob should have cooled down sufficiently by this time, otherwise there is a risk of burns!

If, for whatever reason, you didn’t get around to cleaning the hob in time, we have listed a few household remedies here that can help you clean your ceramic hob.

Lemon juice

For light stains, such as water or limescale stains, simple lemon juice is sufficient. To do this, drip a little of the juice onto a cloth and wipe over the stains as usual. Leave the juice to soak in for about 10 minutes, wipe with a little fresh water and then dry with a dry cloth. If you don’t have any lemon juice to hand, glass cleaner is also ideal for the whole procedure.

Baking powder

Baking soda is an excellent cleaning agent for more stubborn stains, such as burnt-on food. All you need for cleaning is half a packet of baking soda and a tablespoon of water. Rub the mixture onto the dirty areas and leave to soak for around 60-90 minutes. You can now simply wipe off the dried, dirty stains with a dry cloth. Finally, wipe over again with a damp cloth and rub everything dry.


You may also be interested in these articles:


Cleaning the ceramic hob with toothpaste

If scratches have already formed on the ceramic surface, toothpaste can be helpful. The microparticles in the toothpaste smooth the edges of the scratches and make them disappear. All you need to do is rub a small amount of the cream onto the scratched areas with a cloth and then wipe the surface dry with the back of the cloth.

Cleaning stone and vinegar or soda

Now we come to the aforementioned metal streaks. These can be easily removed using a cleaning stone and vinegar or washing soda. The acid contained in the vinegar dissolves the metallic impurities after prolonged exposure, making it easier to remove the streaks. If you prefer to use washing soda instead, apply a small amount to the dirty areas and leave the soda to work for around 20 minutes. You can then wipe away the remaining dirt with a simple cloth. You should use so-called cleaning stones with care, as their use can lead to scratches. Suitable cleaning stones are mainly available in drugstores.

Effective prevention of stains

If all household remedies fail to clean your ceramic hob for some unknown reason, the only thing left to do is to reach for the chemical shelf. You can find suitable cleaning agents in any supermarket or drugstore. But before you get that far, here are a few helpful tips to prevent metallic streaks in advance:

  • Never slide pots and pans over the hob. This not only saves you from stains, but also protects against scratches!
  • Even if the temptation is too tempting – do not wash your pots and pans in the dishwasher! The dishwashing process encourages abrasion of the pots’ alloy, making it easier for it to get onto the hob during cooking.
  • Avoid excessively hot, prolonged cooking temperatures. Instead, turn the temperature up once and then continue cooking at a lower temperature. Excessively high temperatures also promote the abrasion of the metallic alloys of the cooking utensils.

With these helpful tips, you now know how to clean your ceramic hob and remove unsightly metallic stains on the hob!

Source: ruhr24.de

1080x1080 whatsapp

Removing limescale: these two household remedies really help

0

Whether on the sink or in the kettle – limescale deposits occur mainly in the kitchen and bathroom. The white stains not only look unattractive, they are also extremely stubborn. What really helps against limescale and can it be removed with household remedies?

Removing limescale with household remedies

Two well-known household remedies have proven effective in getting rid of stubborn deposits: Vinegar and citric acid. The acid dissolves the limescale and it can then be easily wiped off. However, both household remedies have their advantages and disadvantages, which is why you should bear a few things in mind when using them.

Home remedies also help with stubborn limescale stains. Photo: andhal via Getty Images

1. remove limescale with vinegar

  • The best way to remove limescale is to use household vinegar (5 percent acetic acid) or dilute vinegar essence (25 percent acetic acid) in a ratio of 1:5 with water.
  • Place calcified shower heads, faucet aerators and sink faucets in a cup or bowl filled with vinegar. It will take some time until they are clean again and the limescale has dissolved.
  • A kitchen towel soaked in vinegar helps with limescale deposits in the sink or at the transition between the sink and tap.
  • You can also use vinegar to clean the kettle. Mix 2-3 tablespoons of vinegar essence with at least one liter of water and bring the mixture to the boil in the kettle. The kettle must then be thoroughly rinsed out.

Take care with seals and fittings

The acid contained in vinegar can attack rubber and plastic parts, such as seals. It is therefore better not to clean coffee machines with vinegar. The thin chrome layer on taps and other fittings can also be damaged by the vinegar.

Many people also find the pungent smell of vinegar unpleasant. When vinegar is boiled, it even produces corrosive vapors that should not be inhaled under any circumstances. Therefore, ensure adequate ventilation when working with vinegar and rinse all treated appliances and surfaces with water.

2. remove limescale with citric acid

Natural lemon juice contains between six and eight percent acid. However, pure citric acid (also known as citric acid) is usually used for descaling. You can buy it in powder form or in liquid form at the drugstore. This is how you use it for cleaning:

  • Coffee machines: Dissolve two to three tablespoons of citric acid in one liter of water and run the mixture through the machine. Then rinse twice with clear water.
  • Kettle: Dissolve two to three tablespoons of citric acid in one liter of water and heat the mixture directly in the kettle.
  • Dishwasher: Sprinkle six tablespoons of citric acid into the empty dishwasher, avoiding the sieve. Select a program without a pre-rinse cycle at a minimum of 50 °C and run the machine through.
  • Stainless steel, plastic, ceramic or chrome surfaces: Dissolve three tablespoons of citric acid in one liter of water and wipe the calcified surfaces with it.
  • Washing machine: Mix six tablespoons of citric acid with half a liter of water and pour the mixture directly into the drum. Start a 60°C program without prewash and without textiles in the drum.
  • Teapots, cups and coffee mugs: Depending on the size of the container, add half a tablespoon or a whole tablespoon of citric acid and fill with hot water. Leave to act briefly and then rinse with water.
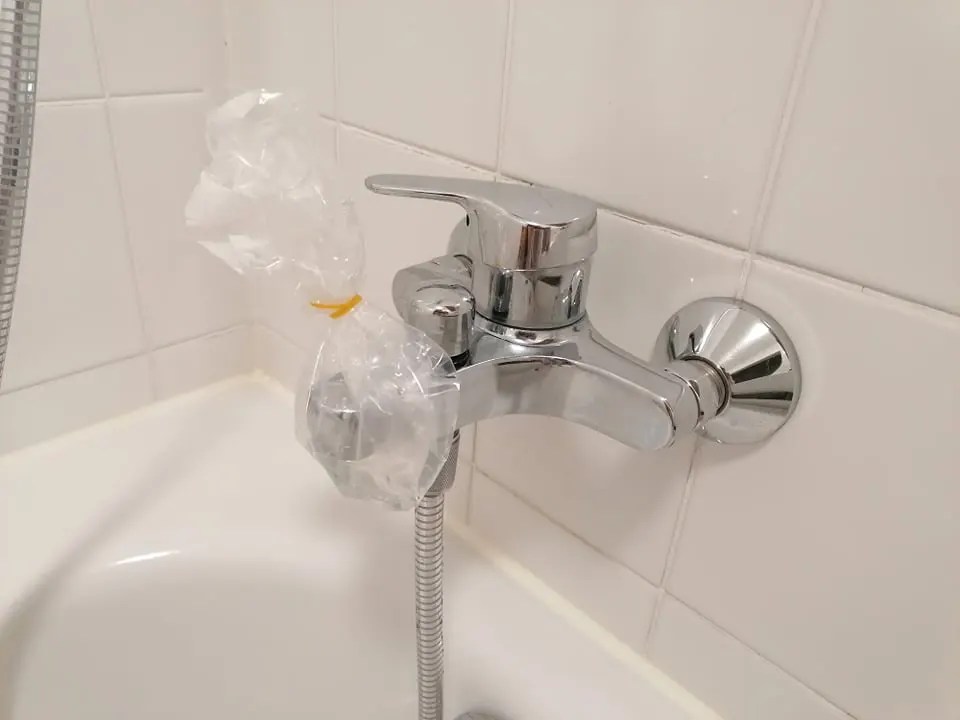
  • Shower heads and fittings: Dissolve one and a half tablespoons of citric acid in a quarter of a liter of water and immerse the calcified parts directly in the solution. A plastic bag can help with non-removable parts.
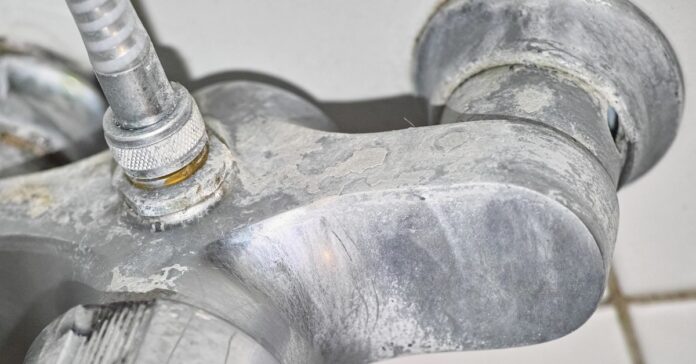
Clean a calcified tap.
You can use a plastic bag to soak taps and shower heads. Photo: Media Partisans/FUNKE Digital

Although citric acid does not smell like lemon, it does not leave an unpleasant odor, unlike vinegar. It can also be used without hesitation to clean rubber or plastic parts and is very versatile. For particularly stubborn limescale, however, the exposure time is several hours. The same basic rule applies here: After cleaning, rinse with clean water.

Tip: Natural lemon juice (from a squeezed lemon, for example) can also be used for light calcification.

Removing ingrained limescale

Ingrained limescale can be a real challenge, as it often stubbornly clings to corners, fittings or the inside of appliances. To remove this limescale, you should use acidic cleaning agents – vinegar, citric acid or special limescale removers are particularly effective here. First, it is advisable to treat the affected surfaces generously with the cleaning agent and leave it to work for a few minutes so that the acid slowly softens the limescale.

You can then remove the limescale mechanically using a brush or sponge that is not too abrasive. For very stubborn deposits, it often helps to repeat the process or leave the cleaning agent to work overnight. Make sure you rinse thoroughly with water after cleaning to remove any acid residue that could attack the material. This will ensure that your fittings and surfaces are not only free of limescale, but also remain in optimum condition.

Correct procedure for sensitive materials

Before you declare war on limescale deposits in your household, it is best to try out the two household remedies on an inconspicuous area. Materials such as natural stone and marble generally do not tolerate acid and should be treated with other products. Vinegar is also not suitable for cleaning copper and aluminum.

Vinegar and citric acid have proven to be particularly effective in removing limescale. Would you still prefer to experiment or try something new? Then try toothpaste, cola, a paste made from baking powder and water or baking paper.

Attention: Caution is advised when cleaning with acids. In the event that your hands come into contact with the cleaning water, you should wear rubber gloves if possible. Avoid getting acid in your eyes at all costs.

1080x1080 whatsapp

Source: ndr
Preview image: ©Leonsbox via Getty Images

Freeze raw broccoli: Guaranteed to work with these tips

0

Sometimes the week goes differently than planned and the fresh broccoli is left in the fridge. Instead of throwing it away, you can freeze broccoli and use it later. If it is already wilted, it is still suitable for a vegetable stock – inedible leftovers belong in the organic waste garbage can.

Freeze raw broccoli correctly

If you Freeze broccoli raw you should follow a few important steps to preserve the quality and nutritional value. Firstly, it is important to select fresh and firm broccoli with no signs of spoilage. Wash it thoroughly under cold water and divide it into equal florets.

Blanching is recommended before freezing: Immerse the florets in boiling water for two to three minutes and then immediately transfer them to ice-cold water to stop the cooking process. This step inactivates enzymes that can otherwise lead to loss of quality such as discoloration, poor taste and nutrient degradation. Then dry the broccoli thoroughly with kitchen paper or in a salad spinner.

It is best to freeze the florets individually on a baking tray before transferring them to airtight freezer bags or containers to prevent them from sticking together. Label the packaging with the freezing date; frozen broccoli will keep in the freezer for around 10-12 months. Note that the broccoli will be slightly softer after defrosting and is therefore particularly suitable for cooked dishes, less so for raw food.

Preserving broccoli: Other options

In addition to freezing, you can also preserve broccoli in other ways. One method is the pickling in vinegar or fermenting – not only keeps longer, but also develops new flavors.

Alternatively, you can boil broccoli after blanching: Filled in sterilized jars and sealed airtight, it will keep for several months. Make sure to maintain a constant temperature in the freezer or pantry to preserve the quality.

Nutrients in the freezing process

Freezing preserves many vitamins and mineralswhich make broccoli so healthy. Vitamin C is largely retained, but slight losses can occur with water-soluble vitamins – especially during long storage or temperature fluctuations.

Other vegetables such as Peas, carrots or spinach can be frozen without any problems. Frozen vegetables remain a valuable addition to your diet, especially when fresh produce is not available.

Checklist: Freezing broccoli made easy

Prepare: Cut the florets from the stalk, wash thoroughly and drain
Blanch: Two to three minutes in boiling water, then quench in ice water
Dry: Drain well or pat dry to avoid ice crystals
Pre-freeze: Pre-freeze the florets individually on a tray so that they do not stick together
Pack airtight: Fill into freezer bags or tins and seal well
Label: Note the freezing date – Shelf life: up to 12 months
Use: Use directly for soups, casseroles or wok dishes without defrosting

This article was partly created with the help of a machine and carefully checked by the editorial team before publication.

Thermomix TM6 or Bosch Cookit? This food processor is the better choice

0

The Thermomix brought high-tech to the kitchen. For a long time, the Vorwerk food processor was regarded as the absolute top dog in its field. Even entire cookbook series were adapted to the all-rounder.

In the meantime, however, the competition has caught up. At the forefront: the Cookit from Bosch. But can the Cookit beat the classic Thermomix?

Thermomix TM6 or Bosch Cookit?

Of course, not everyone can relate to the concept of “high-tech cooking”. But for more and more people, all-round kitchen appliances such as the Thermomix are making everyday life much easier. Beginners in particular enjoy the simple step-by-step instructions that guarantee successful cooking results.

But which food processor should you choose? The individual models all have their advantages and disadvantages. Let’s take a look at two of the market leaders: the Thermomix from Vorwerk and the Cookit from Bosch.

Both appliances are based on engineering skills made in Germany. The basic principle is also similar: both the Thermomix and the Cookit can bake, boil, steam, chop vegetables, puree and so on. The entire cooking process can be monitored and controlled via an app. It’s like being a child again and having your mother tell you what to do next. You no longer have to think and can just look forward to the food.

Another thing you can look forward to: bowls and accessories can be put in the dishwasher after use with both the Thermomix and the Cookit. So you don’t have to wash up by hand after cooking. But what are the differences between the Thermomix and Cookit?

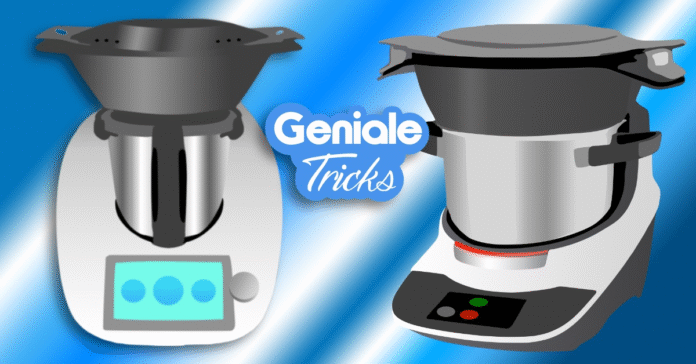
Which is better: Thermomix or the Bosch Cookit? Photo: FUNKE Digital

Bosch Cookit and Thermomix TM6: These are the key differences

Let’s get straight to the point – the Bosch Cookit is ahead in many respects:

  • The Cookit has a larger pot than the Thermomix, which also makes it suitable for large families or guests. The disadvantage: the pot is also heavier as a result. Not for people with arthritis.
  • Also with the Accessories Bosch is more generous. In addition to the knife and whisk, which the Thermomix also has, the Cookit also comes with two slicing discs and another whisk. This enables the Cookit to not only somehow reduce the size of the vegetables, but also to dice, slice or grate them. The disadvantage is that you have to change the attachments more often than with the Thermomix.
  • A major weakness of the old Themomix generations was that you could not fry could. This is now possible with the TM6 – but only up to a maximum of 160 °C and only if you have a subscription for just under 50 euros a year. The Cookit from Bosch can reach 200 °C – without a subscription.
  • Only with a subscription is the Thermomix also available with the Guided Cooking offers – i.e. guided cooking. This function is included with Cookit. However, the Cookit also has a much smaller selection of recipes. The classic from Vorwerk has an enormous advantage here!
  • Further advantages of the Thermomix: You can use it to Grind coffee and grain. You can also save your own recipes in the Thermomix and create your own individual weekly plan create an individual weekly plan.
  • On the subject of susceptibility to repair opinions differ: some praise the Thermomix for the fact that its motor is practically wear-free. Others criticize the sensitive display, for which Vorwerk does not provide a warranty.

Apart from all the details in which the Bosch Cookit is ahead of the Thermomix TM6, the biggest shortcoming of the Thermomix is the de facto obligation to take out a subscription. After all, if you’re already spending a lot of money on a food processor, you want to be able to use all the functions – and not have to fork out an extra 48 euros a year, right? If, on the other hand, you like freshly ground coffee and prefer to cook on the fly anyway, you will probably be better off with the Thermomix.

The facts at a glance:

Bosch Cookit Thermomix TM6
Capacity 3 l 2,2 l
Accessories very good sufficient
Frying yes only with subscription
Grinding no yes
Guided Cooking yes only with subscription
Recipe selection > 2.000 > 70,000
individual weekly plan no yes
Engine power 600 Watt 500 watts
Heating capacity 1,700 watts 1,000 watts
Costs 1.299 Euro 1.399 Euro
(+ 48 Euro/year for subscription)

You might also be interested in these articles:


Conclusion: Is the Cookit really better?

Anyone who enjoys high-tech cooking will be very well served by both appliances. Both are in the upper price segment, but deliver solid results.

The Thermomix TM6 from Vorwerk still has a clear lead when it comes to recipe selection. But how long will it last? After all, Bosch promises to add 30 new recipes every week. In terms of accessories, cooking results, variability and customer friendliness, however, the Bosch Cookit is – in our opinion – already clearly in first place.

Sources: please.buy, magazin.kuechenfinder

Drying strawberries: the perfect snack between meals

0

Have you bought too many strawberries and can’t manage to eat them all fresh? No problem: drying strawberries is an easy way to preserve the fruit and intensify its flavor. Whether as a snack, in muesli or in baked goods – dried strawberries give you a fruity taste experience even in the colder months of the year.

Drying strawberries – step by step

At the Drying the strawberries The water is removed from the strawberries, making them keep longer. At the same time, many nutrients such as Vitamin C and antioxidants are preserved. There are a few things you should bear in mind to ensure perfect results:

  • Preparation: Choose firm, ripe strawberries and wash them thoroughly. Remove the stalk and leaves and cut the fruit into slices. even slices (about 3-5 mm thick) so that they dry evenly.

Three drying methods:

  1. Oven: Place the slices on a baking tray with baking paper or a rack. Dry them at 50-60 °C for 6-8 hours. Leave the door ajar to allow the moisture to escape.
  2. Dehydrator: An energy-saving alternative that offers constant temperatures. Lay out the strawberries in thin layers and dry them according to the appliance’s instructions.
  3. Air drying: This method is particularly gentle, but time-consuming. Place the strawberries on a cloth or grid and place them in a sunny, well-ventilated place. Protect them from insects with a fine net. Drying takes several days.

The strawberries are ready when they are dry, but still slightly pliable are.


You may also be interested in these articles:


How to store dried strawberries properly

Correct storage is crucial so that dried strawberries keep for a long time. Store them in airtight containers such as screw-top jars or vacuum-packed bags to keep out moisture. Store the containers in a cool, dark placeto protect the aroma.

Label the containers with the drying date so that you can keep track. If the strawberries start to absorb moisture after a while, you can place them briefly in the Dry them in the ovento extend their shelf life.

Ideas for using dried strawberries

Dried strawberries are versatile and make an excellent topping for muesli, yogurt or porridge. In baked goods such as muffins or cookies they provide a fruity note that goes perfectly with sweet dishes.

Grind the dried fruit to a fine powder. Strawberry powder – ideal for adding flavor to desserts, smoothies or homemade ice cream. Also in Tea blends Dried strawberries make an excellent addition to tea blends. Combine them with herbs such as mint or lemon balm for a fruity, fresh tea.


You may also be interested in these articles:


Durable and aromatic

Make more of your strawberries with dried strawberries favorite fruits. They are not only durable and space-saving, but also versatile – whether in savory or sweet dishes. Thanks to simple drying methods, you can preserve their intense aroma for a long time and try out creative recipes.

Checklist: Drying strawberries made easy

  • Preparation: Wash the strawberries, remove the stalk and cut into even slices.
  • Drying methods: Choose between oven, dehydrator or air drying.
  • Storage: Store airtight and dark in screw-top jars or bags.
  • Use: Perfect for muesli, baked goods, tea or as a powder for desserts.
  • Tip: Remove moisture by briefly drying in the oven.

This article was partly created with the help of a machine and carefully checked by the editorial team before publication.