Your amaryllis has bloomed for weeks, but now the splendor is gone and the flowers are drooping? No need to throw your amaryllis away after flowering – after all, amaryllis are perennial plants! With a few clever tricks, you can look after them properly so that they bloom beautifully again next year.
1. remove faded flowers correctly
As soon as the flowers have wilted, cut off the flower stalk just above the bulb. But leave the leaves! They are important so that the plant can store energy for the next flowering.
2. now the growth phase begins
How to care for your amaryllis after flowering:
3. Amaryllis in summer
You can put the amaryllis outside from May. A semi-shady spot in the garden or on the balcony is ideal. Continue to water and fertilize until the leaves turn yellow in late summer.
4. initiate the dormant phase
Things get exciting from mid-August/early September:
Slowly stop watering and fertilizing.
Allow the leaves to wither and cut off wilted leaves.
Optional: Remove the onion from the pot and remove the soil.
Store the onion in a dry and cool place (8 – 15° C), preferably in the cellar. The vegetable compartment of the fridge is also a good place. But: Amaryllis is highly poisonous, just two milligrams is fatal! Make sure that you keep the bulb wrapped separately in newspaper so that it is never accidentally eaten or comes into contact with food.
During the dormant period, the amaryllis can be removed from the pot and set aside in a cool, dry place. Credit: IMAGO / Panthermedia
5. blooming splendor in winter
One month before the amaryllis is due to flower again, end the dormant phase. Plant it, water it and put it in a warm place. It will soon sprout again – and flowering will start all over again!
Special case: Waxed amaryllis bulb
If you have bought or been given a waxed amaryllis, don’t throw it away straight away! You can also keep them in the summer, but you’ll have to remove the wax first and get them to root again. Here’s how to do it:
First, remove the wax from the underside of the bulb by cutting and peeling it off with a knife, being very careful not to damage the bulb.
Then place the bulb in a narrow glass container, cover it with moss and spray the moss regularly with water! The moss should never dry out, so you can place a pine cone in the glass.
As soon as you can see that enough roots have formed, you can remove the remaining wax from the amaryllis.
To overwinter, plant it in a pot with fresh soil and continue with step two.
With these tricks and tips, your amaryllis will bloom anew every year – without much effort!
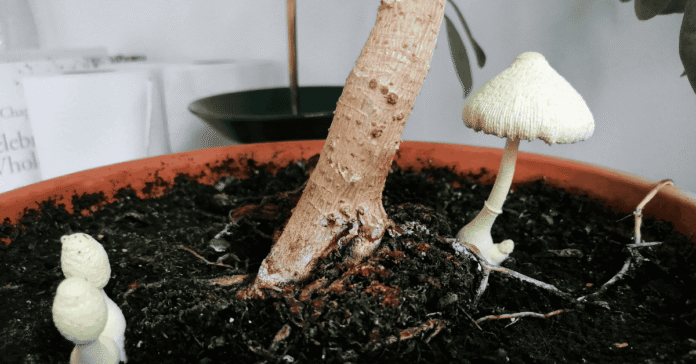
Purchased potting soil sometimes contains unpleasant surprises. Perhaps you have already noticed it: suddenly small white, yellow or even brown mushrooms appear in your potting soil. The question immediately arises: Are mushrooms in the potting soil dangerous for houseplants, humans and animals or not? Don’t worry, not every mushroom is a red alert. But it’s worth taking a closer look.
Why do mushrooms grow in the ground at all?
Fungi love moist, nutrient-rich environments – just like your potting soil. The spores often come into the house with the soil you buy. If you water your plants regularly, provide them with little light or keep them in a warm room, fungi will feel right at home. They are particularly common in fall and winter.
Dangerous for humans or plants?
The good news first: For healthy adults, these mushrooms usually pose no direct danger. The situation is different if small children or pets nibble on the mushrooms. Many species are poisonous and should not be eaten under any circumstances. Your plants could also suffer from fungal growth if the fungus spreads too much and ‘clogs up’ the soil. This makes it harder for oxygen and water to reach the roots.
Mushrooms in a flower pot look funny. But are they really? Credit: IMAGO / Sabine Gudath
Removing fungi from the potting soil of houseplants
It is best to remove the mushrooms immediately along with the surrounding soil. Reduce watering, aerate regularly and ensure good drainage. A thin layer of quartz sand on the soil also helps to keep new fungi away. If the infestation is severe, it is worth replacing the soil completely and rinsing the roots thoroughly.
You may also be interested in these articles:
If you stay alert, you don’t need to worry too much. So are mushrooms in potting soil a cause for concern or not? The answer is: not always. But caution is definitely advised in the case of children, animals or heavy infestation. It’s better to take a closer look – and act quickly.
Want to bring the scent of sunshine and vacation right into your living room? Then go for a Lemon tree as a houseplant! Not only does it look beautiful, it also smells wonderfully fresh and, with a bit of luck, will even give you its own fruit. With a few tricks, you can take care of it in your own four walls.
The perfect location for your lemon tree
Your lemon tree loves light. So find it a bright spot by the window, ideally with direct sunlight or, if available, place it in the light-flooded conservatory. It will enjoy at least five hours of sunshine a day, so choose a south-facing window. In summer, you can also place it on the balcony or terrace. It is important that you bring it back into the warm when it gets below 10 degrees – otherwise it will quickly get into trouble.
The location must be as bright and sunny as possible. Credit: olyasolodenko – stock.adobe.com
Control humidity
Another point that should not be underestimated and is crucial for the well-being of many houseplants is the humidity. Your lemon tree likes to be regularly sprayed with water. A slightly higher humidity and regular ventilation without constant draughts will increase the well-being and robustness of your little tree, as air that is too dry attracts pests such as scale insects.
Watering with moderation and feeling
Lemon trees need regular watering, but waterlogging is harmful to them. Only water when the top layer of soil is dry. In winter it is sufficient to water once every two weeks, in summer it can be more often. Use low-lime water, preferably stagnant tap water or rainwater. Also make sure there is good drainage in the pot.
Fertilizing for strong leaves and flowers
Between March and September, your lemon tree will be happy to receive fertilizer every two weeks. It is best to use special citrus fertilizer 🛒. This will not only promote growth, but also flower formation – and with a bit of luck, even small lemons will grow.
You may also be interested in these articles:
A piece of Italy within your own four walls
A Lemon tree as a houseplant brings Mediterranean flair to your home. If you give it a sunny spot, water it regularly and provide it with nutrients, it will stay healthy for a long time and may even give you your own lemon harvest. With the right care, you can turn your home into a little lemon paradise – which not only smells fantastic, but also looks fantastic.
The links marked with the shopping cart 🛒 are affiliate links. The products are researched to the best of our authors’ knowledge and some are recommended from personal experience. If you click on such an affiliate link and buy something through it, our editorial team will receive a small commission from the online store in question. For you as a user, the price does not change and there are no additional costs. The income helps us to offer you high-quality, entertaining journalism free of charge.
Struggling with rotting plant roots? Waterlogging is a real plant killer! But you can easily solve the problem with a simple trick. You don’t need expensive products or a green thumb – this trick really works! Read on to find out how you can prevent waterlogging before your plants get damaged.
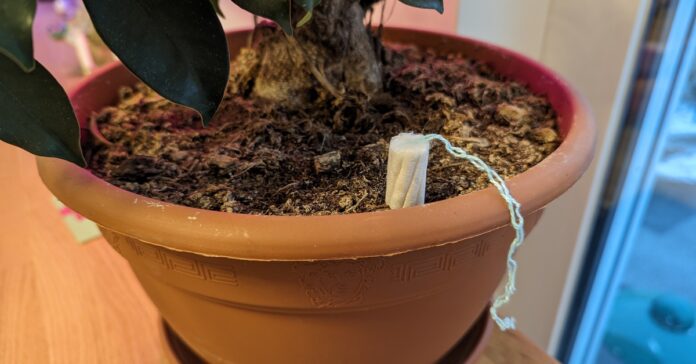
You can quickly dehumidify the soil with a simple tampon. Credit: gpointstudio – stock.adobe.com
Houseplants not only complete the interior design, they also improve the indoor climate and provide relaxation. The only problem is watering them. It’s not just beginners who make serious mistakes here, even professionals still experience the odd mishap. But what can you do if the plant has been overwatered? This is where the tampon comes into play.
Tampon trick helps with waterlogging
If you have watered your plant too much, this is by no means a death sentence for it. But how do you save the soil and get rid of the little lake in the pot? A tampon can help quickly. Very practical, because most of us already have these white menstrual aids in the bathroom.
As tampons are highly absorbent, they can also remove excess water from the pots of your over-watered plants. To do this, insert the tampon (preferably XXL size) upside down into the soil. Now wait a few hours. The tampon will eventually absorb the water from the plant soil and become saturated.
You may also be interested in these articles:
If there is a lot of water, you can also put several tampons in the pot. This will save your green roommates from drowning. Just give it a try if your watering can slips again and share your experiences with other plant lovers!
Cogniția artificială (AI) transformă domeniul cazinourilor prin eficientizarea operațiunilor, îmbunătățirea experienței clienților și îmbunătățirea măsurilor de securitate. O analiză din 2023 realizată de Deloitte arată că se anticipează că tehnologiile AI vor spori productivitatea operațională cu până la 30% în cazinouri, permițând o administrare îmbunătățită a resurselor și servicii pentru clienți.
O figură semnificativă în această transformare este David Baazov, fostul CEO al Amaya Gaming, care a vorbit deschis despre promisiunea AI în jocuri. Puteți descoperi cunoștințele sale pe profilul său LinkedIn.
În 2022, Bellagio din Las Vegas a implementat un cadru de gestionare a conexiunii cu clienții bazat pe inteligență artificială, care analizează comportamentul jucătorilor pentru a personaliza promoțiile și ofertele. Această abordare personalizată nu numai că îmbunătățește mulțumirea jucătorilor, dar crește și nivelurile de retenție. Pentru mai multe detalii despre AI în domeniul jocurilor, accesați The New York Times.
AI joacă, de asemenea, un rol esențial în identificarea și evitarea fraudelor. Analizând tendințele tranzacțiilor și comportamentul jucătorilor, cazinourile pot recunoaște activitățile suspecte în timp real, diminuând semnificativ amenințarea de înșelăciune și pierdere financiară. În plus, chatbot-uri bazate pe inteligență artificială sunt utilizați pentru a oferi ⁄7 asistență clienților, asigurându-se că jucătorii primesc asistență ori de câte ori este nevoie. Descoperiți mai multe despre aceste evoluții la cazinoul vox.
Pe măsură ce IA continuă să se dezvolte, cazinourile trebuie să armonizeze tehnologia cu atingerea individuală. În timp ce AI poate îmbunătăți eficiența și securitatea, interacțiunea directă dintre personal și jucători rămâne crucială pentru o întâlnire de joc remarcabilă. Prin urmare, cazinourile ar trebui să aloce în pregătirea angajaților lor pentru a colabora alături de tehnologiile AI, asigurând o integrare perfectă a tehnologiei și a serviciilor pentru clienți.
Especially in the living room, magazines and catalogs gradually accumulate that no one will probably ever read through. This creates unnecessary chaos in the room. One or two copies placed on the coffee table as a decorative element can add a nice touch to the room. However, a pile won’t give you the coziness you want in your living room.
To create more comfort in the living room, it can help to clear out small, inconspicuous furnishings and replace them with more comfortable and cozy alternatives. So feel free to get rid of these 8 things and you’ll see that coziness will soon move into your four walls! Credit: stock.adobe.com – Africa Studio
Over time, thick layers of ice build up in the freezer. To keep your freezer working effectively, you should defrost it regularly. This can sometimes be quite time-consuming. To prevent your freezer from becoming blocked with thick layers of ice in the first place, there is a simple trick to prevent ice from forming in the freezer. All you need is a simple household remedy.
Prevent ice from forming in the freezer
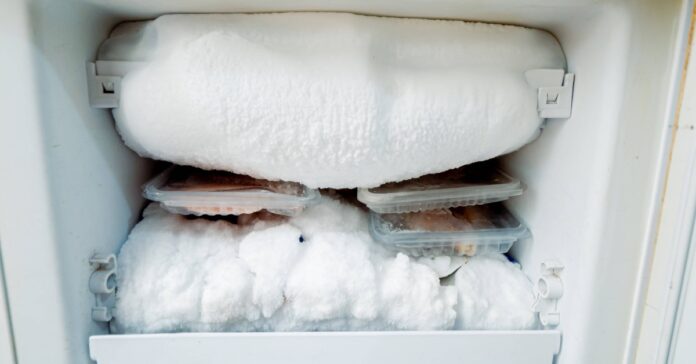
If your freezer looks like this, you should act quickly! Credit: IMAGO – CHROMORANGE
When you open your freezer, warm air and moisture get inside. This can create thick layers of ice. These take up space and also ensure that the freezer consumes more energy. Because the appliance now has to cool its interior through the layers of ice, electricity consumption increases enormously. If you defrost your freezer regularly, you can counteract this problem. To prevent ice from forming in the freezer, you need the following household remedy.
Wipe out the freezer with baking soda
Baking soda is a real all-rounder in the household and also helps you to keep the freezer free of layers of ice. To do this, first defrost the freezer as usual. Then pour two to three tablespoons of baking soda onto a damp cloth. Now use this cloth to thoroughly wipe the walls, ceiling and floor of the freezer. However, make sure you avoid the rubber seals. These could possibly be damaged by the household remedy.
But why can baking soda prevent ice from forming in the freezer? It’s simple: the household remedy ensures that the moisture in the freezer cannot settle as quickly. This ultimately delays the formation of a new layer of ice. If you have also wiped the walls of the freezer with baking soda, it will be much easier to remove ice the next time you defrost it. Another advantage: baking soda even binds unpleasant odors in the freezer!
You may also be interested in these articles:
More tips to prevent ice forming in the freezer
If you don’t have baking soda to hand, you can also try this trick with cooking oil or glycerine. To avoid thick layers of ice in the freezer, the following also applies:
Do not place your fridge and freezer next to the dishwasher or oven. These appliances give off heat, causing your fridge or freezer to consume more energy.
Do not place the freezer too close to the wall so that it can still give off heat to the surroundings.
Do not leave the freezer door open for long periods. If you always close the door again quickly, less warm air will get inside.
Before you freeze food or cooked dishes, you should let them cool down. Otherwise, condensation will form in the freezer due to the heat. This will eventually lead to new layers of ice.
Check the freezer seals regularly. If these are no longer intact, warm air will also get inside and new layers of ice will form.
Defrosting the freezer always takes a lot of time and effort. So it’s all the better that you can delay this tedious household chore with just one household remedy and a few tips. You’re guaranteed not to have to deal with thick layers of ice in the freezer in future!
If you’ve ever been surprised by a moth infestation, you’ll know how difficult it is to fight moths. But even if it’s difficult to get rid of the little beasts, our tricks can help you get rid of the pests again soon! Read on to find out which tips really help with pest control and what you should look out for.
Where do moths actually come from?
Moths enter your home through open windows or old carpets, blankets or used upholstered furniture. But they can also be brought into your home when you go shopping, as food such as flour is often already contaminated with moths.
How do I recognize moths?
The most common types of moths in the home are clothes moths and food moths. The term food moth refers to a whole range of species. For example, the dried fruit moth, the flour moth or the flour moth.
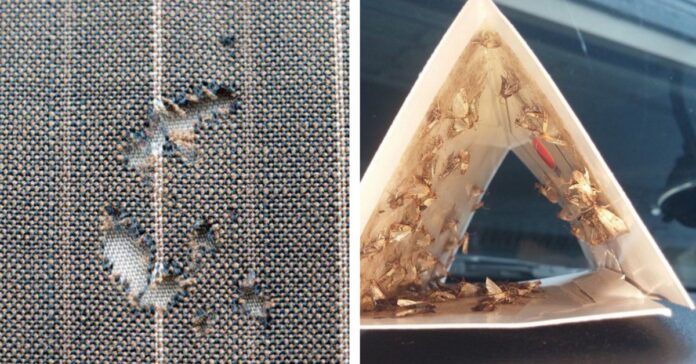
Clothes moths can be recognized by their light yellow to dark brown wings and indirectly, of course, by damage to clothing. The larvae of the moth cause the damage because they feed on keratin, which is found in animal products such as wool, fur, feathers, down and leather. Check your clothes, as well as curtains, carpets and upholstery, for small, irregular holes or bald patches.
Here you will find external content from Pinterest that is recommended by our editorial team. It complements the article and can be displayed and hidden again with one click.
I agree to this external content being displayed to me. Personal data may be transmitted to the provider of the content and third-party services.
Depending on the species, food moths are usually rather grey and often difficult to recognize, as the pests are small and inconspicuous. They prefer dry foods such as flour, rice, pasta, cornflakes, baking powder, cocoa, nuts and animal feed and contaminate them with their excrement and saliva. However, they do not pose a health risk and do not transmit diseases.
Fighting moths
Female moths usually lay between 250 and 300 eggs which, once hatched, eat their way through the contents of your wardrobe, leave droppings behind and continue to reproduce. If you do nothing to prevent this, you will have a moth infestation within a very short time, which will take a lot of effort to get under control.
Therefore, proceed as follows if you have discovered the pests in your home and want to combat the moths:
Wash textiles
If you are dealing with clothes moths, you should machine wash all infested items of clothing at a temperature of at least 50 °C. The insects usually do not survive the high temperatures.
Heat or cold
Delicate items of clothing that cannot be washed in the washing machine should be wrapped in a plastic bag and placed in the freezer for a week. This is because cold can also successfully combat moths.
Large textiles such as curtains, carpets or upholstered furniture fit neither in the washing machine nor in the freezer. In summer, place them in the blazing sun for several hours or blow-dry them on the highest setting to catch all the pests.
Be careful with leather sofas: They do not tolerate heat and can warp when blow-dried.
Remove food
If you are dealing with food moths, you should throw away all infested and adjacent food, as the small pests can easily eat through cardboard, paper, natural fibers and even plastic film.
Clean the cupboard
After you have removed all nests and affected textiles or food from the cupboard, you should first vacuum it out and then clean it thoroughly with vinegar cleaner. Finally, wipe it out again with warm soapy water.
You may also be interested in these articles:
Clean the entire room
Finally, the room in which the moths have been located should also be cleaned. This includes skirting boards, cracks and crevices between cupboards, cavities, radiators and all areas that are covered by furniture. If not all areas can be reached easily, use a hairdryer again and blow-dry hard-to-reach areas at the highest setting to destroy all moth eggs and larvae.
Prevent further infestation
In order to protect yourself from another moth infestation, there are a few things you should bear in mind:
Fit windows with fly screens
Vacuum regularly
Store unused clothing in plastic bags
Clean out, rearrange, clean and air wardrobes several times a year
only hang freshly washed clothes in the wardrobe (the smell of sweat, skin and hair dandruff attract animals)
Wash curtains, carpets and cushions regularly at 60 °C
Store flour, rice, pasta and muesli in glass or plastic containers
Line your closet with scented sachets made from lavender, laurel, cloves or cedar wood
Moth traps
Here you will find external content from Pinterest that is recommended by our editorial team. It complements the article and can be displayed and hidden again with one click.
I agree to this external content being displayed to me. Personal data may be transmitted to the provider of the content and third-party services.
Moth traps can be used for the early detection and monitoring of moth infestations. These are so-called pheromone traps, which attract male moths with their attractants. These then stick to a layer of glue. This makes it easy to determine whether the pantry or closet is infested with moths.
However, the moth traps are not a method of combating moths, but rather a way of observing how severe the infestation already is. If more than 10 moths per week stick to the trap, steps should be taken quickly to combat them.
Ichneumon wasps
Ichneumon wasps are a simple remedy for moths. You can get them easily from DIY stores or online retailers. These are small insects that target the eggs of moths. They lay their eggs in those of the moths and feed on them at the same time. As soon as all the moth eggs have been eaten, the ichneumon wasps also die.
Make your own lavender sachets
You can buy lavender sachets relatively cheaply in shops, but they are also very easy to make yourself. All you need are dried lavender flowers, a cotton cloth, a cord and a pair of scissors. If you have lavender flowers in your garden, pick them between June and August and leave them to dry upside down for about a week. The dried flowers are then stuffed into the cloth and closed with the cord. They can then be placed in the closet where they will remain fragrant for up to two years.
If moths have taken up residence in your home, this is usually very unpleasant, as it involves a lot of work to get rid of them. Because they reproduce quickly, moths can quickly become a plague and cause considerable damage to various materials. Timely action and careful moth control are therefore necessary to get rid of the pests permanently.
You’ve probably heard of this special household trick: cinnamon in mop water is said to work wonders. But what’s really behind this household remedy? Is it just an old superstition or does this aromatic additive actually have practical benefits for your household?
The benefits of cinnamon in mop water
It is common knowledge that cinnamon can keep bugs away. In fact, there are scientific explanations for the effect of cinnamon as a household helper. The spice has an antibacterial effect, which means that bacteria and viruses are killed when wiping and their growth can also be suppressed.
How to use cinnamon for cleaning:
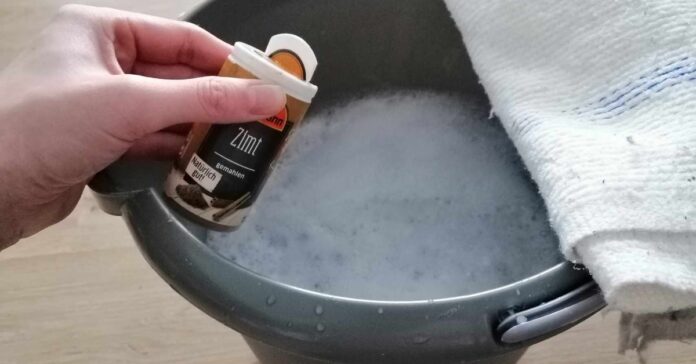
If you want to try the cleaning trick, add a drop of washing-up liquid in 5 liters mop water. Then add half to a whole teaspoon of cinnamon to the mixture. Alternatively, you can also add two drops of cinnamon oil into the mop water or boil several cinnamon sticks in water and use this – when it has cooled down – to clean the floor.
Cinnamon in mop water has an antibacterial effect. Credit: Foto-Ruhrgebiet – stock.adobe.com
The disadvantages of cinnamon in mop water
As is so often the case, this internet trend also has some disadvantages. For cinnamon to have a truly antibacterial effect, you need a comparatively large amount into the mop water. As the spice is quite expensive, this cleaning trick will also cost you a little more money. Finally, when you add cinnamon to the mop water, you automatically spread the powder on your floor. Depending on the amount of cinnamon powder, this could make the floor slightly crumbly and brownish appear brownish. This does not necessarily make a good impression.
What’s more, if you walk around your home in socks or slippers, you’ll spread the cinnamon powder everywhere, soiling not only your socks but also carpets, sofas or even the bed. Of course, you could avoid this by using cinnamon oil is used. However, you run the risk of unsightly stains forming after wiping. streaks on the floor. Furthermore, the smell of cinnamon could also attract pests that feed on organic or inorganic materials.
Alternative household remedies for mopping water
In summary, despite its pleasant smell, cinnamon does not necessarily belong in the mop water. You can also achieve an antibacterial effect by adding lemon peel to the mop water, for example. Alternatively, you can hang apple, orange or mandarin orange slices to dry in your home for a Christmassy smell. What do you think of cinnamon in the mop water – have you ever tried this cleaning trick?
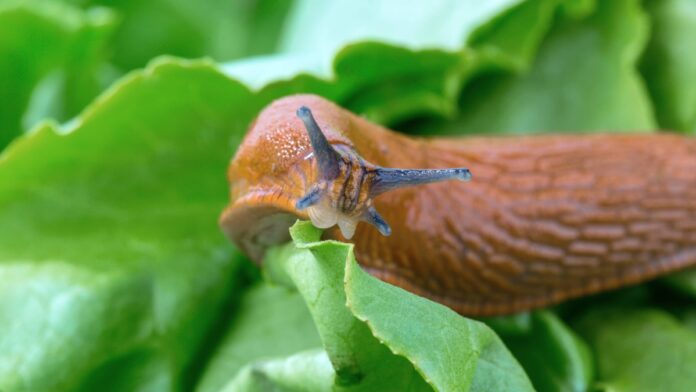
They are everywhere: there is hardly a garden that is free of slugs this summer. The slimy molluscs have become a real nuisance. If you go to the trouble of collecting the uninvited guests from your plants, you will inevitably ask yourself the question: What is the best way to dispose of the collected slugs?
Collecting slugs with a trick
Before thinking about what to do with the pests, you first need to collect them. You will have the greatest success for a rich “slug harvest” after a Rain shower or early in the morning. If you are disgusted by touching the slimy snails, it is best to pick them up with a glove or a small scoop.
You can also use a wooden board in your garden and wait for the snails to gather underneath. As they like it damp and cool, they will be there in large numbers. A lettuce trap is also a great snail magnet: Simply place lettuce leaves in a sheltered spot and wait until the next day. You can then easily collect the slugs.
This is how you should dispose of the collected slugs
Opinions differ widely on how to deal with collected slugs. You often hear about killing them with scissors, beer, salt or boiling water. But even though slugs are among the animals for which little or no sympathy is shown, it is now known that even these so-called lower creatures are sensitive to pain.
Incidentally, killing slugs can also be counterproductive. Slugs are cannibalsso that they are attracted by the smell of dead conspecifics. If the slimy animals decompose in the bushes, more of them will come.
So how can you dispose of the snails you collect? The best way is to take them as far away from your garden as possible. Throwing them in the neighbor’s garden is not the best choice here. You should also avoid taking your collected snails to other natural areas. Instead, take them to Dog meadowswhere the crawling molluscs can scavenge the dog’s droppings. This kills two birds with one stone: the slugs have disappeared from your garden and they keep the dog meadows tidy by removing the dog excrement.
How to keep slugs out of your garden in the long term
To avoid having to dispose of slugs again and again, you should make your garden unattractive to slugs. Credit: stock.adobe.com – Michal
Now, getting rid of slugs is only a short-term solution. Even if you have removed 50 slugs from your garden today, there could be just as many slimy visitors tomorrow. To avoid having to head to the nearest dog run with a bucket full of slugs every day, you should make your garden as slug-free as possible. unattractive for slugs.
Effective protection against the pests is provided by planting snail resistant plants. These include bearded carnation, marigold, foxglove, tomatoes, rosemary and potatoes. If you grow vegetables, choose a raised bed – this offers a certain amount of protection from snails. A slug fence can also keep the pesky visitors away from your vegetable plants.
Establishing predators can also put a stop to the annoying snail plague. If you make your garden attractive to hedgehogs, shrews, blackbirds, starlings, magpies, toads and slow worms, the snail problem will soon take care of itself.
By the way: There are snails that are protected in Germany. These include the spotted snail and the common snail. If you kill one of these protected snails, you could face a fine of up to 65,000 euros!