Home Blog Page 800

Adhesive tiles for kitchen & bathroom: inexpensive renovation without mess

0

May makes everything new! The merry month of May is ideal for giving your kitchen or bathroom a new look. Find out here how you can conjure up a new look for your walls without any major (financial) outlay. Adhesive tiles are the perfect solution! These practical helpers are easy to apply, cause no mess and adhesive tiles will transform your kitchen and bathroom into a modern feel-good space in no time at all. If you now feel like sticking down tile foil, you should read on quickly!

The advantages of adhesive tiles in the kitchen and bathroom

Renovating kitchens and bathrooms is very time-consuming. Chiseling out the old tiling in particular not only causes a lot of mess, but also frustration. You can transform your old tiles into a modern eye-catcher with very simple tools. And you don’t need any manual skills or a bulging wallet to do it.

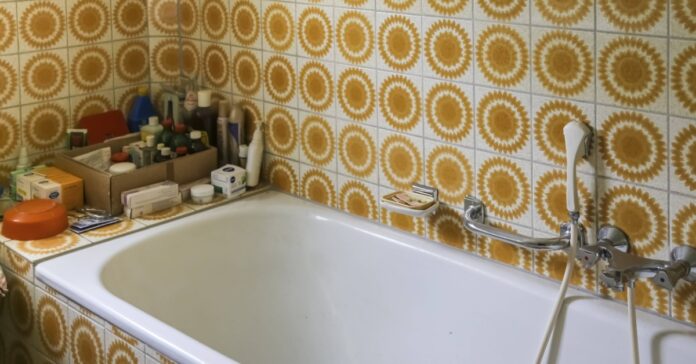
If your bathroom looks like this, you can beautify it with adhesive tiles. Photo: IMAGO / imagebroker

Adhesive tiles have become increasingly popular in recent years. This is mainly due to the fact that the modern tile film looks almost indistinguishable from original tiles. Adhesive tiles for kitchens and bathrooms are available in every conceivable color and shape. Further advantages are:

  • Simple installation of the adhesive tiles without cement or grout
  • No renovation work necessary – no dust, no dirt
  • Quick change of your living space
  • Versatile usability on different surfaces
  • Later removal easily possible – ideal for rental apartments!

Adhesive tiles are not only stylish to look at, they also serve a purpose just like their “siblings” made of clay, stoneware or ceramic. For example, adhesive tiles in the kitchen act as a stylish splashback that protects your walls from splashes of fat.

Tip: Adhesive tiles are also available in a 3D look. This means that lines, artificial joints or decorations can be felt, enhancing the tactile experience of the tile film.

On which surfaces do adhesive tiles adhere?

Adhesive tiles had their beginnings in the renovation of old bathrooms in rented apartments. Especially in apartments that have not been renovated for many years, sometimes even decades, the bathroom is a visual horror. Old-fashioned tiles that reach up to the ceiling are not very inviting. However, tenants are generally not allowed to make any major changes to their apartments.

Without further ado, adhesive tiles were then applied to the old tiles to give the bathroom a modern look. If you want such an adhesive makeover for your bathroom, you should bear in mind that the tile joints will be visible through the thin adhesive film. It is best to use individual adhesive tiles rather than a continuous adhesive film. When buying adhesive tiles for the bathroom in particular, you should make sure that they are also suitable for contact with water and steam.

Tip: If you want to stick over floor tiles, special adhesive films are also available for this 🛒.

You can apply adhesive tiles to a wide variety of materials:

  • glass
  • Ceramic tiles
  • Stone
  • Plastic
  • Veneers
  • and in many cases even on wallpaper

However, always follow the manufacturer’s instructions to ensure optimum adhesion.


You may also be interested in these articles:


Trendy designs for adhesive tiles in your kitchen

There is virtually no pattern, shape or color that is not available in tile foil. Especially with adhesive tiles in the kitchen, you can really let off steam when it comes to splash protection: You can achieve a great effect with just a few materials and the adhesive tiles can be easily removed if you don’t like them.

Elongated stick tiles 🛒 in soft colors such as pink or beige are particularly modern. Combined with golden fittings, you can create an elegant boho look. Metro tiles 🛒, which are also available as a practical adhesive version, are and remain the classic among tiles. Whether timelessly elegant in white and black or as a colorful eye-catcher: the rectangular tiles in a staggered pattern always look timelessly chic!

If you prefer something more unusual, herringbone pattern tiles 🛒, hexagonal tiles 🛒 or colorful designs 🛒 may be the right choice for you and your kitchen or bathroom.

Tip: If you invest in high-quality, slightly more expensive adhesive tiles for your kitchen or bathroom, you will enjoy the new look for longer. With cheap tile foil, the adhesive can come off more quickly.

Installation made easy

Once you have decided on the right tiles, it’s time to get down to the nitty-gritty or “sticking”. How to apply adhesive tiles correctly:

  • Prepare the substrate: If you want to apply adhesive tiles to your old tiles, check that the tiles are not damaged. Cracks may be visible later due to the thin adhesive film. Clean the substrate thoroughly and remove grease, dust and dirt.
  • Apply adhesive tiles: Position the adhesive tile in the desired location and remove about one centimeter of the backing film. Press the adhesive part onto the substrate and now slowly and evenly peel off the remaining backing film.
  • Use a squeegee: To apply your adhesive tiles evenly, you should use a squeegee with a felt edge 🛒. Use the squeegee to carefully scrape the adhesive tile from top to bottom as you peel off the backing film. Make sure that there are no air bubbles under the tile foil.

Tip: You can cut the adhesive tiles to the right size with a cutter.

Adhesive tiles in the kitchen and bathroom: a sustainable and stylish alternative to tile renovation

If you are concerned about the environment as well as a modern look when sprucing up your kitchen and bathroom, you should make sure that recycled materials and adhesives tested for harmful substances and low emissions are used when selecting your adhesive tiles and that the tile foils are PVC-free.

Adhesive tiles are a cost-effective, time-saving and creative way to beautify your kitchen and bathroom. You can completely redesign your living space with minimal investment and no previous craft experience. Just give it a try!


Source: haus.de, myhomebook.de

1080x1080 whatsapp

Organize your pantry: Tips for organizing and stocking up

0

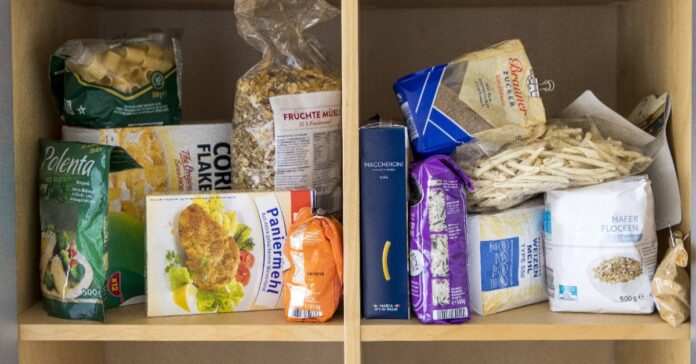
There are foods that need to be stored refrigerated and those that prefer a dry environment. The latter include flour, pasta and potato chips, for example. These foods are usually stored in a larder – the lifeline for hungry spontaneous visitors and anyone who hasn’t made it to the supermarket in time before closing time. What does your store cupboard look like? Are the various storage containers neatly labeled and lined up next to each other? Or are you more like “Team Chaos” and stuff all the dry ingredients randomly into the cupboard? Find out here how you can organize your pantry sensibly and keep it permanently clear!

Why the pantry can do more than just “store”

A well-stocked and organized pantry not only saves time and money – it also reduces stress. Because if you know what you have, you can avoid double shopping, reduce food waste and don’t have to panic and rummage through confusing rows of shelves when a visitor is suddenly hungry. Knowing that you can conjure up a meal on the spur of the moment is also a very reassuring feeling.

Is your pantry a mess? With a few simple tips, you too can keep things tidy! Photo: IMAGO / Jochen Tack

Unfortunately, the reality is often different. It’s easy to lose track of the various packets of flour and sugar, torn open spice sachets and countless baking utensils. But don’t worry: we’ll help you get your pantry in order. Let’s go!

Tip: Modern kitchens have larder units with pull-out drawers. These provide a better overview.

Organizing the larder unit: The basics

The key to an organized pantry lies in one simple principle: visibility. If you put your food in transparent, airtight storage containers, you can see what’s left at a glance. The transparent containers also protect against moisture and uninvited visitors. You certainly don’t want mealworms in your flour or bread beetles in your baked goods!

It’s best to sort your food roughly by category:

  • BreakfastJam, honey, muesli, coffee
  • CookingPasta, rice, pulses, tomato paste
  • BakingFlour, sugar, vanilla sugar, baking powder
  • SnacksCookies, chocolate, potato chips

Within these categories, it makes sense to place the products according to frequency of use. If you are a passionate baker, you should also place your baking ingredients within easy reach, whereas tins can be stored at the back of the cupboard.

Tip: Try to keep your food organized in the pantry. If every ingredient has its fixed place, you reduce the chaos.


How to keep things tidy: tips for a long-term overview

Once you’ve taken the first step and organized your pantry, the trick is to keep it tidy in the future. You can do this with the following tips:

  • First in, first outOlder food belongs at the front. So you use up what’s about to expire first.
  • Don’t forget to labelIf you are transferring supplies, you should note the best-before date on the containers.
  • Clean out regularlyCheck your stock at least once a quarter for expired food or damaged packaging.
  • Let airKeep about 20% of the space in your larder free. This not only makes it easier for you to take out individual items of food, but also creates space for spontaneous purchases.

You may also be interested in these articles:


Pantry heroes: What should definitely be included?

Of course, there is no universal list of foods that absolutely belong in a store cupboard. But you will soon realize that it makes little sense to stockpile ten bottles of ketchup and sugar, but you won’t find anything in your supplies that will really fill you up.

So that you can conjure up a spontaneous meal on the table at any time, the following products should not be missing:

  • Dry provisionsPasta, rice, flour, sugar, lentils, breadcrumbs, cornflakes
  • Tins and preserving jarsTomatoes, tuna, corn, red cabbage, French beans, canned fruit
  • Spices and condimentsSalt, pepper, oil, vinegar, mustard, stock powder, ketchup, mustard
  • Baking ingredientsBaking powder, vanilla sugar, semolina, oat flakes
  • Long-life drinksUHT milk, mineral water, tea, coffee
  • Sweet & SaltyChocolate, potato chips, cookies, nut nougat cream, margarine

The contents can – and should – of course be customized. If you don’t like tuna, you don’t need to store it. Maybe an extra jar of pesto for a spontaneous visit?

Conclusion

Organizing a pantry doesn’t just mean arranging tins and packets neatly. It means making your everyday life and your kitchen more efficient, less stressful – and a little bit smarter. With a little system, the cupboard becomes a treasure chest that can unleash its culinary superpowers in an emergency.

Source: moderne-hausfrau.de

1080x1080 whatsapp

Connecting the washing machine to hot water: Is the money-saving tip worth it?

0

In most households, the washing machine is one of the biggest consumers of electricity. This is mainly due to the fact that heating the water for washing clothes consumes a lot of energy. Perhaps you have already thought about connecting your washing machine to the hot water to reduce costs? After all, the water is already heated and no longer needs to be heated electrically by the machine. But is this supposed money-saving tip really as effective as it sounds? Find out here!

What requirements must be met to connect a washing machine to hot water?

The most important point first: If you are now eager to connect your washing machine to hot water, you will probably be disappointed. This is because most commercially available washing machines only have a cold water connection. The majority of washing machines are designed to take cold water and heat it to the desired temperature of between 30° and 95°.

Have you ever thought about connecting your washing machine to hot water? Photo: OR MIXphoto – stock.adobe.com

However, there are special models from a few manufacturers that have a separate hot and cold water connection. Of course, this extra is not for free: these appliances usually cost around 10 percent more than comparable standard models.

If you have decided to buy such a washing machine, you are faced with a new problem, because in addition to the right appliance, a suitable hot water connection must also be available. In apartment buildings, there is often a laundry room for all tenants, where you will usually only find a cold water pipe.

Bathrooms and kitchens, where washing machines are often located, have a hot water connection, but in most cases this is already occupied. You would need to install a hot water double connection angle valve 🛒 to use the existing connection multiple times.

The temperature hook

A new washing machine is too expensive for you and you’re thinking about connecting the existing cold water connection of your washing machine to the hot water tap? That’s not a good idea! Hot water from the tap has a temperature of at least 60° for hygienic reasons. However, this water temperature is far too high for most textiles.

However, as your machine no longer has access to cold water, the temperature cannot be reduced and your favorite clothes will be ruined during washing. What’s more, the materials used in normal washing machines are not designed for continuous operation with hot water. The water hose, seals and other components can wear out more quickly due to the constant heat and lead to technical problems.

Technical solutions: If you still want to try

If you don’t have a washing machine with a double connection, there are still ways to use the hot water to do your laundry. All you need to do is connect special devices between your water connection and your machine:

  • Mixer tapA mixer tap 🛒 is the cheapest, but also the most complex solution. With this appliance, you have to turn on the hot water yourself for each wash cycle and turn it off again after about ten minutes to then turn on the cold water. If you forget to do this, your laundry will be washed too hot.
  • Thermostatic mixerA thermostatic mixer 🛒, on the other hand, is somewhat more convenient. This allows you to set the desired temperature, but you have to adjust it to the respective laundry before each wash cycle.
  • BallastThese devices automatically mix hot and cold water to the set temperature and maintain it. However, such luxury comes at a price: ballasts cost from 300 euros upwards.

You may also be interested in these articles:


Connecting the washing machine to hot water: Is it really worth the effort?

The key question is: will you actually save energy and money by connecting your washing machine to the hot water? That depends on several factors:

  • Your washing behaviorIf you frequently wash at high temperatures, you can save money by connecting your washing machine to the hot water. If you tend to wash at low temperatures, it is not worth the effort.
  • Your home’s hot water productionIf your hot water is produced electrically, you will hardly save any energy. With central heating using fossil fuels, moderate savings are possible.
  • Climate-friendly water heatingThe hot water connection is most effective when the water is heated by a heat pump or solar thermal energy.

By the wayA modern washing machine consumes around 150 to 220 kilowatt hours a year for four washes a week, which corresponds to current electricity costs of 40 to 60 euros. The purchase and installation costs for special appliances or additional solutions therefore often only pay for themselves after many years.

Conclusion: Alternatives for saving energy

As tempting as the idea of using hot water from the tap to wash your dirty laundry in a cost-saving way sounds – on closer inspection, this supposed money-saving tip turns out to be more of a flop. Instead of investing in expensive conversions and accepting possible damage to your machine, you could consider buying a particularly energy-efficient washing machine and washing in an energy-saving way.

Using eco programs, washing at low temperatures and filling the washing drum correctly can also have a positive effect on your energy consumption. These measures are often more practical and can bring similar or even better savings than the costly connection of your washing machine to the hot water.


Source: haus.de

1080x1080 whatsapp

Clean the drain pipe: This home remedy loosens the blockage immediately

0

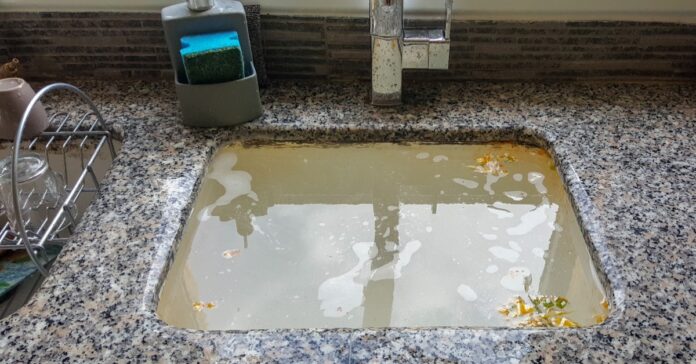
The kitchen sink should really only be used for washing dishes, draining pasta water or washing vegetables. However, things usually end up in the sink that don’t belong there, such as leftover food, dust or hair. It is inevitable that the sink will become blocked at some point and the water can no longer drain properly. Before you resort to chemicals, here’s how you can clean your drainpipe with a simple household remedy.

Cleaning a blocked drainpipe with vinegar

To remove hair, food residue, soap and grease from the kitchen sink, you need vinegar essence. You probably already have this popular household remedy at home. This is because the vinegar reacts chemically with baking soda. The resulting foam dissolves dirt. A simple and thorough way to clean this part of the kitchen. This is the best way to do it:

  • To clean the drain, add about four tablespoons of baking soda 🛒 into the drain and then pour with about half a cup of vinegar essence 🛒 to.
  • Leave it to work for about 10 minutes so that the baking soda and vinegar mixture can work its “magic”.
  • Then rinse with warm water and enjoy a clean drain. If you feel that the drain is still not completely clear, repeat the process.

Tip: You can also mix the vinegar with water and heat it up a little before pouring the mixture down the drain.

Cleaning the kitchen also includes cleaning the drain pipe. Photo: Igal – stock.adobe.com

This trick is as simple as it is ingenious, isn’t it? Instead of using chemicals, you can clean your drainpipe naturally! This not only saves you money, but is also environmentally friendly!


Source: kaercher

1080x1080 whatsapp

Folding bed linen: Ingenious method creates more space in the wardrobe

0

Making the beds ranks somewhere between clearing out the cellar and cleaning the windows on the popularity scale of household chores. But all the moaning is useless: regular bed-making is not only hygienic, it also ensures a better night’s sleep. And with tricks such as the clever corner or the roll mop trick, making up fitted sheets, comforters and the like is quick and easy. But before the actual bedding is made, there is usually the chaotic search for the right bedding on the agenda. To save you the hassle of rummaging through the linen drawer, we’ll show you an ingenious trick for folding your bed linen in future.

Put an end to the laundry chaos

There must be a pillowcase here somewhere …! And where is the matching sheet for the new bedding? I hear there are people for whom even the bed linen drawer is meticulously tidy. They iron the covers and sheets straight after washing or drying and then store them neatly in pairs in the wardrobe.

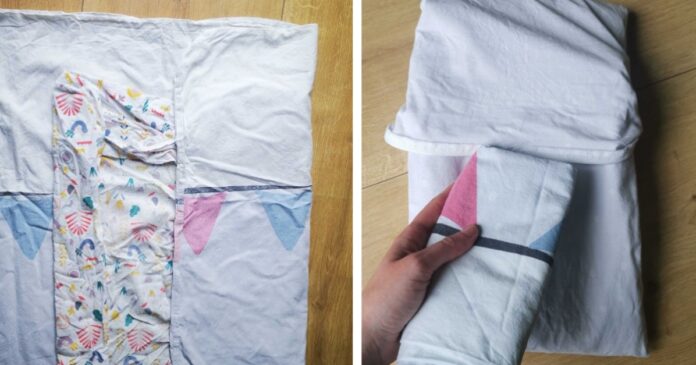
With this ingenious folding method, you’ll never have to search for matching bed linen again! Photo: FUNKE Digital

And then there’s everyone else who squeezes the clean bed linen into a gap in the bed base or a drawer somewhere. It’s no wonder that the next time you make your bed, valuable time is lost looking for the individual components. Once you’ve finally found what you’re looking for, the comforter, sheets and pillowcase may be together, but they’re also pretty crumpled. Find out here how to avoid this chaos with a simple trick!

Clever bed linen folding made easy

Admittedly, you will have to invest some time in this method after washing, because from now on, randomly stuffing things into the cupboards is prohibited! Grab the comforter cover and pillow and also the matching sheet. First, spread the comforter out on the floor; you can also lay two comforters on top of each other if you have a set.


You may also be interested in these articles:


Now place the sheet, folded once or twice in the middle depending on the size, on the two blankets. Smooth everything out so that you can now start folding the bed linen. Fold the long sides of the comforter once to the middle and then fold both long sides over each other. Then fold the end with the button placket or zipper over once by about 30 cm.

Now you just need to fold the bed linen over from the opposite side until this end protrudes a little over the foot end of the comforter. Then tuck this end between the button placket or zipper. Finally, fold the pillows together so that you can also tuck them under the foot end of the comforter. That’s it!

No more Tetris in the linen drawer

This simple folding trick turns your chaotic pile of bed linen into a neat, compact package that you can easily store in your wardrobe, bed base or drawer. In the future, bedding will almost make itself and tedious rummaging will be a thing of the past.

If you fold your bed linen in this way, you will never have to search for missing pillows again and, as a positive side effect, your linen will no longer crease so easily. It also creates more space in your wardrobe. Who would have thought that keeping things tidy could be so satisfying?

Source: instagram.com/easyinterieur

1080x1080 whatsapp


Wash the down comforter: This mistake will break it

0

A down comforter is a wonderful investment for restful sleep – light, cozy, warm and breathable. But sooner or later the question arises: How do I get my down comforter clean again? Many people are reluctant to wash their high-quality comforter themselves for fear of it getting lumpy or damaged. However, with the right procedure, you can easily clean your down comforter at home and maintain its quality for years to come. Here you can find out what is important when washing down comforters.

When is cleaning necessary?

A down comforter does not need to be washed as often as bed linen, for example. As a rule of thumb, a thorough cleaning every two to three years is usually sufficient if you use a comforter cover. However, there are signs that make earlier cleaning necessary: Stains, unpleasant odors or if the comforter has lost significant fluffiness. People with house dust allergies benefit from more frequent washing as this reduces mites and allergens.


You may also be interested in these articles:


It is often sufficient to air the blanket regularly between washes. Hang it outside for a few hours on a dry, not too sunny day. This refreshes the down and allows moisture that has accumulated overnight to escape.

The right preparation and washing method

Before you get down to business, first check the care label of your down comforter. Most modern down comforters are machine washable, but there are differences in the recommended washing temperatures and care instructions.

For machine washing, you need a sufficiently large washing machine – for a single comforter at least 7 kg capacity, for a double comforter preferably 9 kg or more. If your machine is too small, the down comforter cannot be rinsed properly and may not get clean.

Choose a special down detergent that preserves the natural oils in the feathers. Do not use fabric softener, as this sticks the down together and impairs its insulating effect. Wash the comforter at a maximum of 40 degrees on a gentle cycle and add two to three clean tennis balls or special drying balls. These will prevent the filling from clumping together.

You should avoid this mistake when washing your down comforter. Photo: agencies – stock.adobe.com

The drying process: you should avoid this mistake

Drying is the most important step in caring for your down comforter. If dried incorrectly, even a perfectly washed comforter can become lumpy or moldy. You should only spin-dry the comforter briefly and at low speed so as not to damage the quills.

The best method is to tumble dry at a low temperature. Here too, tennis balls or drying balls help to loosen the down. The drying process takes considerably longer than for normal washing – allow two to three hours, or longer for thicker comforters. Interrupt the process several times to fluff up the comforter and distribute the down evenly.

Drying a down comforter without a dryer

If you don’t have a tumble dryer, lay the comforter flat on a washing rack and turn it regularly. Air drying can take several days. Important: Make sure that the blanket is completely dry before you use it again, as residual moisture can lead to mold growth.

With these tips, your down comforter will stay fresh and fluffy for a long time – for many more nights of restful sleep under your clean, cozy comforter.

1080x1080 whatsapp

Source: utopia

Dispose of packaging chips correctly: should they be disposed of in residual waste or in the yellow garbage can?

0

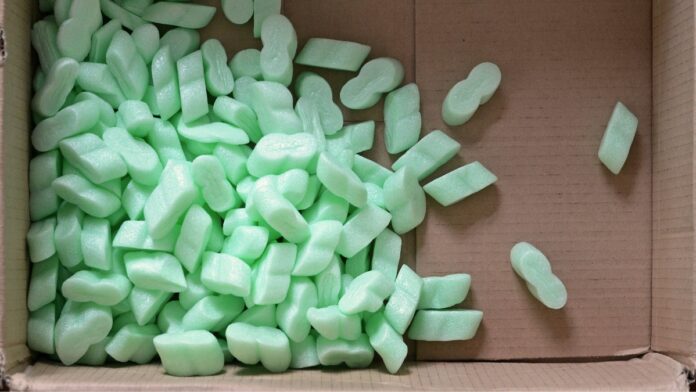
Online shoppers are familiar with the small packaging chips that are used as filling material in parcels to protect sensitive goods during transportation. Whether glass vases, bottles or fragile goods – the small, colorful flips form a protective barrier between the product and the cardboard wall. But where and how should the packaging chips actually be disposed of once their role as transport protection has been fulfilled? Do they belong in the residual waste or in the yellow garbage can? Find out here!

Packaging chips: How to dispose of the filling material from the parcel correctly

Not all packaging chips are the same: The popular filling material can be made of different materials. Recycled polystyrene is traditionally used as a filling material, as it is lightweight and offers good protection against impact. However, chips made from composted starch (from potatoes, corn or wheat) are also used in shipping parcels.

How are the colored packaging chips disposed of correctly? Photo: IMAGO / Shotshop

Due to the different materials, you may assume that the packaging chips must also end up in different garbage cans, but this is not the case. Both organic and recycled packaging chips belong in the yellow garbage can or the yellow bag.

And there is a simple reason for this: if you mistakenly dispose of the packaging chips in the residual waste, they cannot be reused and valuable resources are lost. Packaging material – regardless of its type – is recyclable and should be returned to the material cycle.

How you can reduce packaging waste

Of course, it is best to avoid (packaging) waste in advance. So think carefully about whether you would be better off buying certain products from local retailers instead of receiving them in the post. Some companies also use ecological filling material made from 100% renewable raw materials.

Alternatively, you can also keep the packaging chips to use as padding for your next parcel. And the cornstarch packaging chips are particularly popular with young children. They can make all kinds of fun figures out of the colorful flips. All you have to do is moisten the packaging chips with a little water and they will stick together.

When you receive your next package, you will now know how to properly dispose of or reuse the packaging chips it contains.

1080x1080 whatsapp

Source: ruhr24.de
Preview images: ©IMAGO / Shotshop
Manuela Manay – stock.adobe.com

Simple cinnamon trick to save rotten orchids

0

Your orchid looks sad? No need to panic! You can save it with a simple kitchen helper: Cinnamon! Yes, you read that right – the popular spice works wonders for ailing orchids. It protects against fungi, disinfects roots and promotes healing. How to protect your Save orchids with cinnamon with an ingeniously simple tip that really works!

There are basically two types of rot in orchids: Heart rot and stem rot. Here you can find out how to recognize these diseases in orchids and in which cases there is still hope of saving the plants.

Orchid rot: heart rot

Heart rot in orchids is often caused by stagnant water between the leaves. From there, the water reaches the inside (the “heart”) of the plant, where fungi and bacteria multiply within a very short time. The orchid rots and in most cases can no longer be saved. Heart rot is often only recognized when it is already too late.

At first, apparently healthy leaves fall off all at once and other leaves detach from the plant at the slightest touch. The areas affected by heart rot first turn yellow, later they turn black or mushy.

Orchid rot: stem rot

Stem rot is also manifested by dark, rotten spots and falling leaves. With this disease, however, the leaves of the orchid do not rot from the inside outwards, but from the outer leaf tip inwards.

Stem rot, also known as root rot, can also be recognized by limp leaves. This is because the rotting root can no longer supply the leaves with sufficient nutrients. Rotting roots are predominantly dark brown to black, hollow and very soft. If the stem rot is very advanced, this also leads to the death of the plant.

Trick with cinnamon should save the orchid

Cinnamon has an antibacterial, antimicrobial and disinfectant effect and can therefore save rotting orchids – at least if you react early enough.

For heart rot:

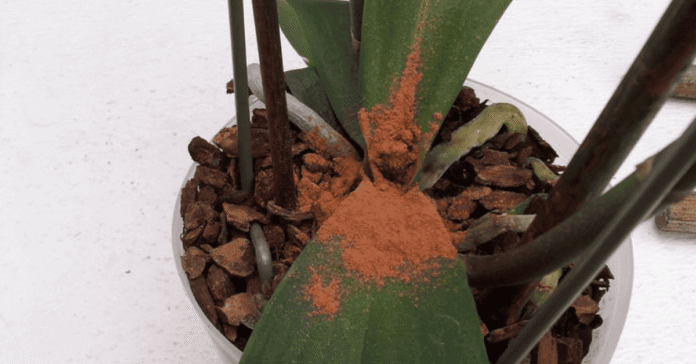
If only very few parts of your orchid are affected by heart rot, you should do the following: First remove all rotting parts of the plant generously. Then disinfect the cut areas with cinnamon powder. Then place the orchid in fresh, dry substrate.

Here you will find external content from Pinterest that is recommended by our editorial team. It complements the article and can be displayed and hidden again with one click.

I agree to this external content being displayed to me. Personal data may be transmitted to the provider of the content and third-party services.

For stem rot:

Stem rot that is not yet too far advanced can usually be treated quite successfully with cinnamon. Proceed as follows:

  • Take the plant out of the pot and remove the rotten roots and the old substrate. Sprinkle a little cinnamon over the cut areas.
  • Then place the plant on a glass filled with water so that only the lower tip of the stem and the healthy root remnants are moistened.
  • Now place the glass in a warm, bright place, out of direct sunlight.
  • The roots can now grow back – this can take a few months.

Tip: If the roots are not yet affected by stem rot, you can simply sprinkle the rotting areas with cinnamon powder and place the orchid in fresh, dry substrate.


You may also be interested in these articles:


To prevent your orchids from rotting, you should avoid waterlogging at all costs. In addition, too frequent watering, too high humidity and too little fresh air can lead to rotting in sensitive houseplants.

It is generally advisable to remove orchids from the pot once a week and immerse them in stale tap water for approx. 30 minutes. Then allow the orchid to drain well before putting it back in the pot.

Source: ruhr24
Preview image: ©Pinterest/orchiddynasty.com

Are house spiders poisonous? What you need to watch out for

0

Surely you know this spider, right? The house spider is one of the most common spiders you can find in your home. Many people are frightened when they encounter this large, fat but also fast spider. Some may even have asked themselves the question: Is the house angle spider actually poisonous? Here you can find out more about this spider and whether such worries might be justified.

No danger to humans

First of all, the reassuring news is that the house angle spider is basically harmless to humans. Even if it appears threatening at first glance due to its size and speed, it does not usually attack. It only bites if it feels seriously threatened and has no way of escaping. And even if a bite does occur, it is harmless for a healthy adult.

But you will definitely notice it: it feels a bit like a pinprick. You can feel it, but it is not comparable to the sting of a bee or wasp. And the venom? Fortunately, it is not strong enough to cause serious damage to your health.

Not dangerous, but useful

Although most people are disgusted by them and would therefore rather banish them from their own four walls yesterday than today, the house spider does fulfill some useful functions in the household. For example, it feeds on other insects such as flies, mosquitoes and smaller bugs that enter your home. In this way, it keeps your home virtually clean – and also protects you from many a mosquito bite at night.

The house angle spider is creepy, but useful. Photo: IMAGO / Manfred Segerer

What should you do if you find a house spider?

Most house angle spiders look for a quiet, dark place and prefer nooks and crannies where they can spin their webs. You don’t need to take any special measures to control the spiders as they don’t usually appear in large numbers. If you discover a house spider and want to get rid of it, you can catch it with a jar and put it outside – but it probably won’t survive there. This is because house spiders are adapted to living in houses.

Experts therefore advise not to trap house spiders and simply leave them where they are. This may take some effort on the part of some people, but it is the more animal-friendly option. Even though many people are creeped out by them, house corner spiders pose no danger to us – and even help to get rid of other annoying insects. So if you can live with that, just leave them where they are.

Source: t-online

These modern, easy-care houseplants will instantly make your home more beautiful

0

Do you want fresh greenery in your home but don’t have green fingers? No problem! Modern, easy-care houseplants are the perfect solution for anyone who has little time but doesn’t want to do without stylish decoration. With the right plants, you can create a cozy, feel-good atmosphere in no time at all – without the stress of watering or complicated care.

Sansevieria

The Sansevieriaalso known as mother-in-law’s tongue, is one of the absolutely indestructible plants. You can even forget about it for two weeks – it will still look great. Its modern, upright growth fits perfectly into minimalist interiors.

Mickey Mouse Cactus

The spherical plant bodies are strongly reminiscent of the face and ears of the famous cartoon mouse. The Goldopuntia looks funny with its up to ten centimeter long limbs and can even produce yellow flowers in a pot. Give it a nutrient-rich substrate and an airy environment and, above all, don’t be too strict with watering.

Goldopuntia, also known as Mickey Mouse cactus, loves dry warmth. Photo: IMAGO / Depositphotos

Ferns

Ferns are real miracle plants because they do a lot for the indoor climate. Just give them a shady, preferably moist spot and they will thank you with bushy growth and beautiful greenery – a place in the bathroom would be ideal. Spray and water your fern regularly, but avoid waterlogging at all costs, otherwise there is a risk of mold.

Schefflera

The Schefflera is one of the Rays Aralia and is also known as the umbrella plant. It prefers a bright location without direct sunlight and mild to warm temperatures. Make sure that it never gets cooler than 10° Celsius in its location.

Zamioculcas

The Zamioculcas zamiifolia (short: lucky feather) shines with glossy, dark green leaves. It gets by with little light and only needs water every few weeks. Perfect for you if you are often on the move or don’t always have your plants in view.


You may also be interested in these articles:


Monstera

If you want a bit more of a statement, then get a Monstera. It grows quickly, is forgiving of care mistakes and really brings your home to life with its large leaves. Combined with a simple pot, it looks particularly modern.

Violin fig

The Ficus lyrata is right at the top of the popularity scale. Beautiful, large leaves are combined with absolute unpretentiousness. Give it a bright location, little water and occasionally remove dust from the leaves.

Pilea – the green trendsetter

The Pileaalso Ufoplant is a real eye-catcher. Its round leaves and compact growth make it a favorite on Instagram. It is also frugal and only needs a little water regularly.

Money tree

The money tree had a somewhat dusty image for a long time, but is right at the forefront when it comes to trendy plants. Undemanding to care for – water it as little as possible – it loves light and warm conditions without direct sunlight.

With modern, easy-care houseplants, you can bring a relaxed urban jungle feeling into your home. Not only do they look good, they are also forgiving of minor care mistakes. Whether you travel a lot, have little light or simply don’t feel like watering every day – you’re guaranteed to make the right choice with these plants.

1080x1080 whatsapp

Source: Houzz, Beautiful Living